Instruction
The Wedge Guy’s favorite wedge practice drills
I received an email from a reader this past week asking me what my favorite practice routines or drill were for sharpening my wedge game — or at least warding off any creeping wedge yips. My theory from years of experience and multiple bouts with that ailment is that it stems from poor fundamentals, which leads to one or two skulled or chunked short shots — which then can advance into full-fledged wedge yips.
So, my wedge practice routine begins with a detailed look at fundamentals – posture, alignment, ball position, grip/grip pressure – and then advances to examination of the actual chipping and pitching motion of the swing.
Rather than get into those fundamentals, I’ll dive right into my favorite practice drills once those are re-visited and in place. No matter what your skill level might be, I am convinced that time spent on these will yield giant rewards in your scores and enjoyment of the game. There is nothing quite so demoralizing and maddening than to hit a good drive and better-than-average approach shot, then chunk or skull a simple chip or pitch, turning a par or bogey-at-worst into a double or even more.
How can the shortest shot on the hole be the one that causes the most frustration and damage on the scorecard, not to mention the havoc it wreaks in your mental state? So, let’s move onto what I think are some great practice drills and routines to keep your scoring game at its best.
Core activation
The key to a solid short game is to control the swing with the rotation of your body core, rather than to allow the arms and hands to be the driver. When I’m about to start a short game session, I like to begin with the club extended in front of my body, with my upper arms close to my chest, then rotate my upper torso back and through, to give me the sensation that I am moving the club only with my core rotation, with the hands only having the job of holding on to it. In this drill, you want to ensure that the clubhead is exactly in front of your sternum as you rotate back and through. When you lower the club into the playing position, this puts the upper end of the grip pointing roughly at your belt buckle and it stays in that “attitude” through the backswing and follow through.
S-L-O-W motion
I believe one of the most misunderstood and destructive pieces of advice in the short game is to “accelerate through the ball”. What I see much too often is that the golfer fails to take a long enough backswing and then quickly jabs at the ball . . . all in the pursuit of “accelerating through the ball”. In reality, that is pretty hard NOT to do if you have any kind of follow through at all. Relying on that CORE ACTIVATION move, I like to make very slow swings – back and through impact – experimenting just how slow I can make the swing and still see some ball flight. You’ll be amazed at how slow a body rotation can be made and still make the ball fly in a nice trajectory
Windows
I’m borrowing this term from Tiger Woods, who often spoke of hitting his iron shots through certain “windows”, i.e. first floor, second floor, etc. He was and is a master at controlling ball flight. For your short game, I simplify this into hitting short pitch shots on three different flight trajectories – low, medium and high. I have found the simplest way to do this is to use the same swing for each shot and determine the trajectory by where you place the ball in your set-up. Start by finding the ball position that gives you what you consider to be a “normal” trajectory with your sand wedge. Then, hit some shots with the ball just one inch back and forward of that spot and see what trajectory you get. You can then take that to another level by repeating the process with your other wedges, from your highest lofted to your lowest.
Ladder drill
For this exercise, I like to have some room on the range or practice area that lets me hit balls any distance I want, from ten feet out to about 25 yards, or even more if you can. I start by hitting a basic chip shot to fly precisely to a divot or piece of turf I’ve targeted about ten feet in front of me. The next shot I try to land where that ball stopped. I repeat that process until I have a line of balls from ten feet to 25 or so yards from me. With each shot, I repeat it until I can land my shot within a foot or less of my “target ball.”
The idea of this kind of practice with your short game is to hit so many shots that you feel like you can do anything with the ball, and you can take that confidence and execution skill to the course. You can literally work through a few hundred shots in an hour or so with these drills, and there’s nothing like repetition to build a skill set you can trust “under fire.”
- LIKE169
- LEGIT27
- WOW13
- LOL6
- IDHT4
- FLOP7
- OB6
- SHANK12

Ever wonder how a simple looking golf swing can produce so much speed and power? The answer may lie in the biomechanics of throwing a punch.
Below is an image of a boxer throwing a right handed hook. Note the direction the body moves to produce maximum force towards the target.

As the boxer pulls back his arm, there is not an excess wind-up or big turn to create power. His body is now geared to go forward and around into the opponent. His body would stay mostly level throughout the motion.
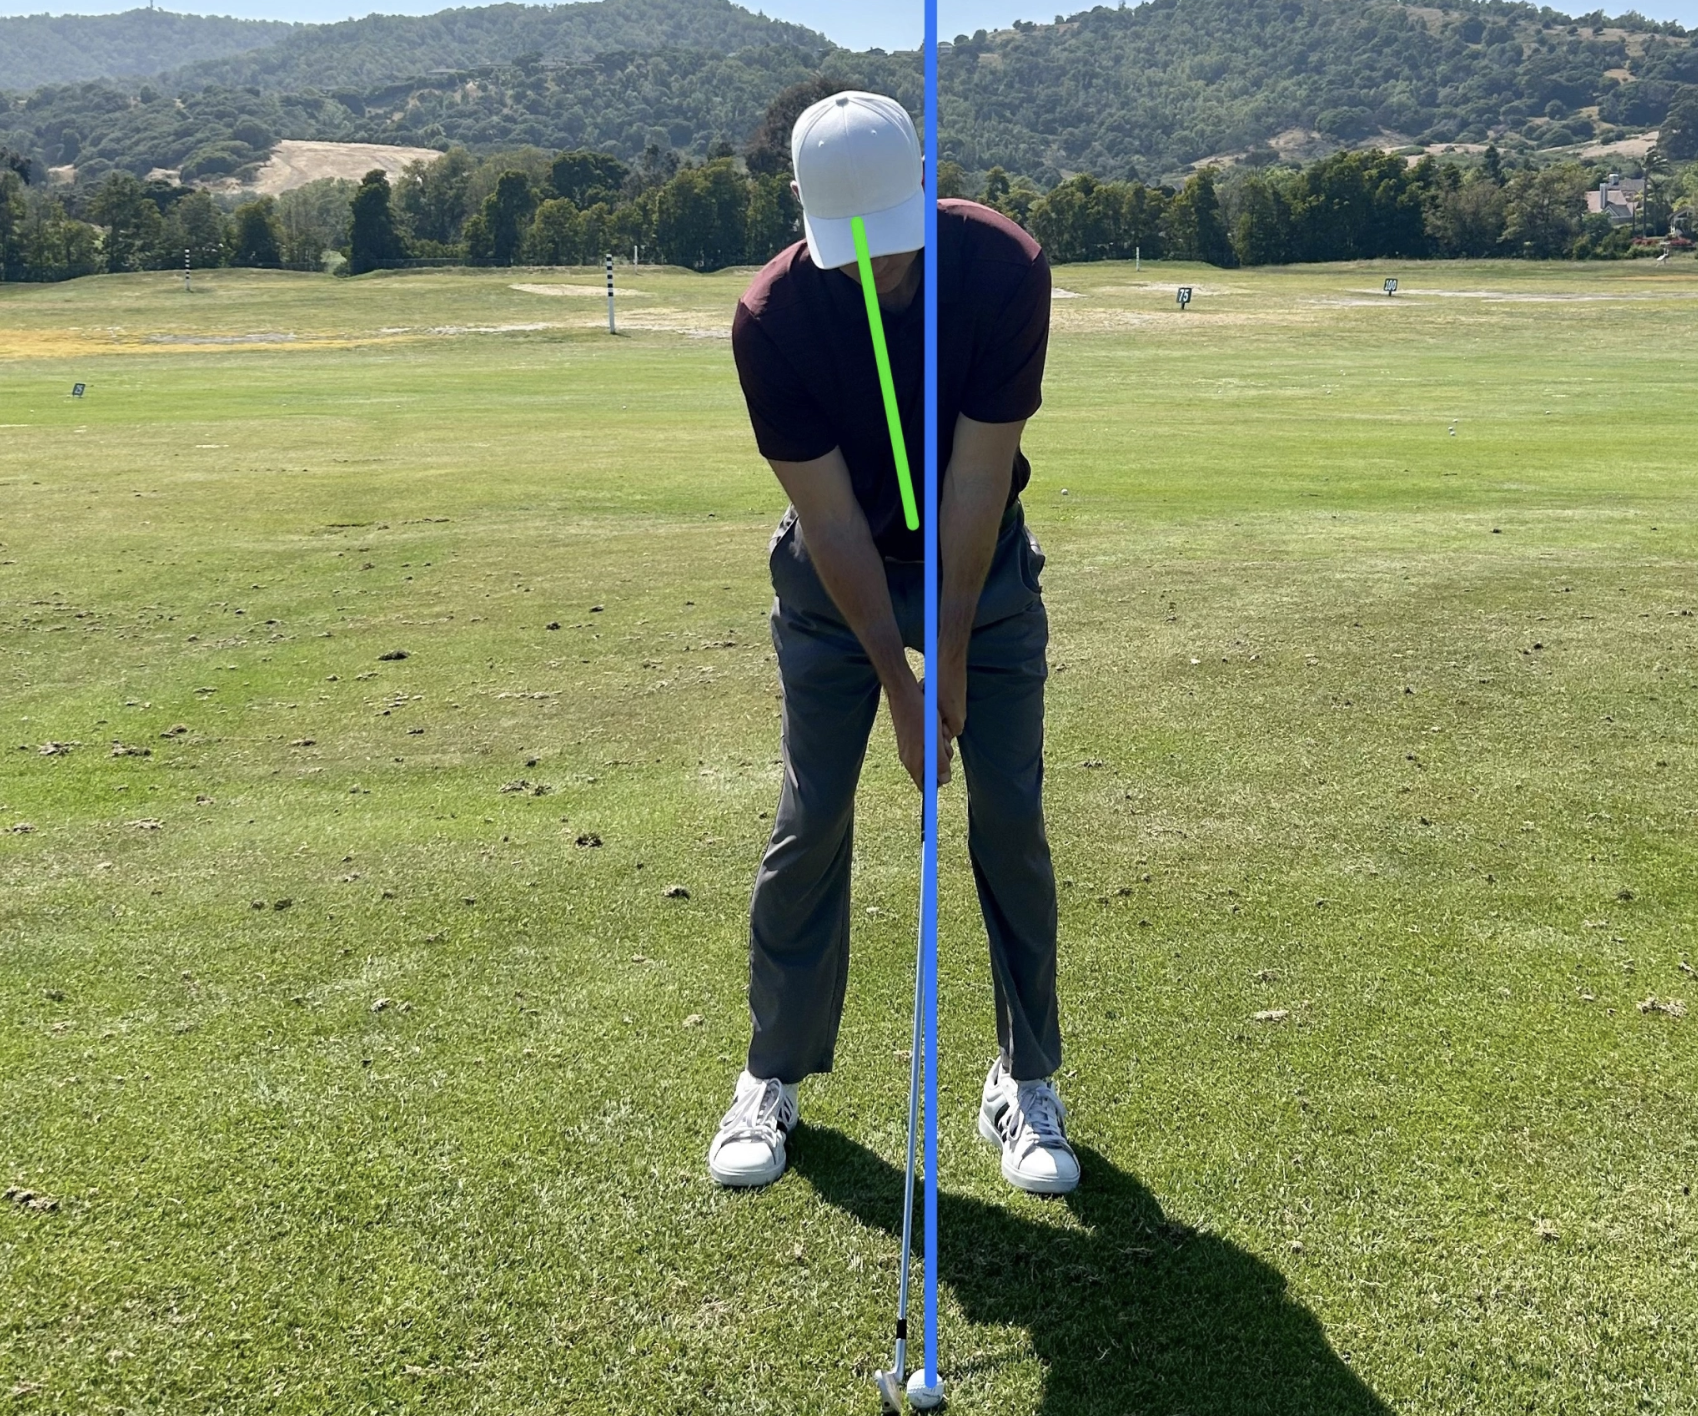
Now lets apply this simple concept to the golf swing. At address, the player would have his upper body and mass positioned behind the ball. In the picture below, note the green line indicting his mass back behind the blue baseline over the ball.
From here, the player can coil around his center, much like a boxer positioned ready to punch.

Now the body can go forward and around towards the target, pulled by the arms. Note the body finishing ahead of the blue baseline.

A body that has a lot of left side bend or “tilt” in the backswing, will naturally counterbalance in the downswing. This will often result with the upper body falling back in the downswing. (Pictured below)
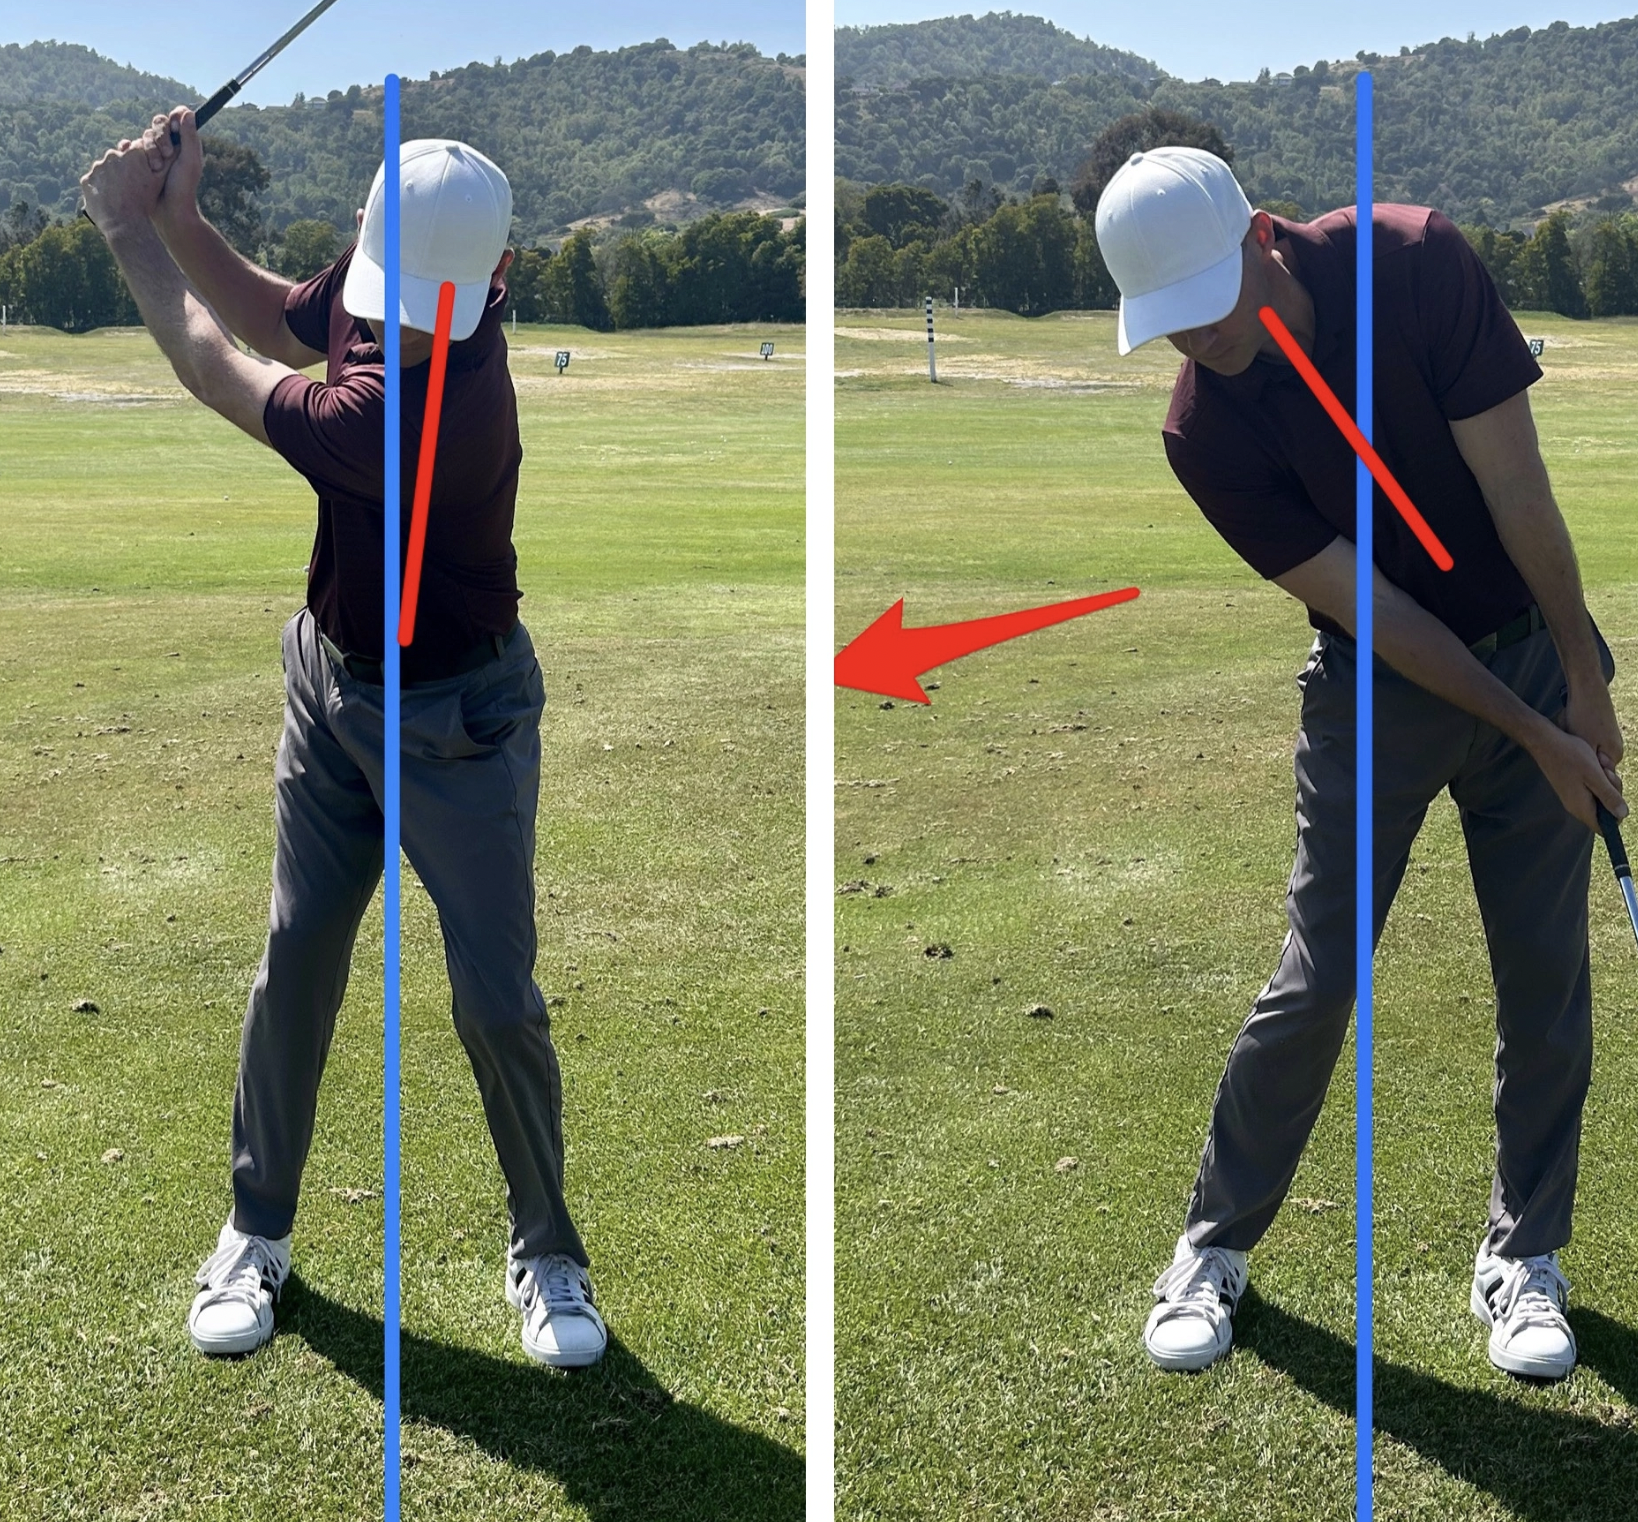
The pattern above would equivalent to attempting to punch forward with your arm while your body is moving backwards. Next time you are looking to make a swing change, first check the movement of your body, and see if it is as simple as boxer throwing a powerful punch.
Twitter: KKelley_golf
- LIKE23
- LEGIT7
- WOW0
- LOL0
- IDHT2
- FLOP0
- OB0
- SHANK7
When we are playing a round or hitting balls on the range over a long period of time, we tend to grip the club tighter, stand up, and quickly lose the ability to maintain posture during the golf swing.
As players, with the spine angle out of posture, we overcompensate in many ways. The first thing that many players do poorly, as a result of poor posture, is grip tighter and stiffen the arms. These are the two biggest culprits that will inhibit consistency and any innate ability to set up well and brush the grass. Gripping tighter also leads to poor use of the body’s bigger muscles ie. the core. The spine angle in good posture will activate the core regions and enhance the body’s ability to coil, thus allowing the transfer of weight from the trail to the lead side.
In the quest to better ball striking, our first priority is understanding the importance of grip strength and grip pressure. Our second priority is posture and always initiating the proper spine angle by bowing forward from the hip (pelvic tilt) and letting the arms hang. After positioning the spine angle, check the body’s alignment )ie. shoulders, hips, knees, and feet) by positioning them parallel to the target line. This process composes the beloved and all-important set up.
How to set up to the golf ball: The basics
Our ability to set up and control grip pressure is the source of our ability to play well and consistently over time.


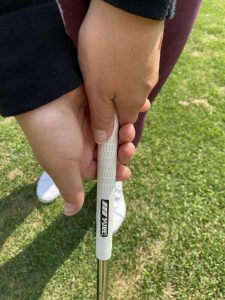
The first essential step is setting the grip in the lead hand
The main pressure points to focus on in gripping with the lead hand are, first and foremost, in the initial placement of the club’s grip in the fingers and allowing the top of the grip to rest on the palms pad. The first pressure point is in the lead pointer finger behind the shaft and the second pressure point is when we let the club rest on the palm’s pad. The lead thumb is the third pressure point. Proper grip strength is determined by trial and error swings.
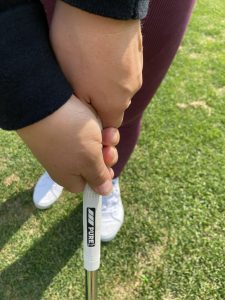
As we grip the club in the trail hand, it is important to grip lightly and in the fingers with the right thumb pad placed on top the left side of the grip. For reference, there are markings on all golf gloves to help each player understand where their grip should be placed.
The essential second step is bowing from the hips to create the spine angle


As we bow, the focus is to aim the leading edge perpendicular to the target line. Looking at the first groove of the club (if it is an iron) can help the eyes focus on this step. A lot of mistakes happen when our eyes start looking around while we do this instead of focusing on an intermediate target and using our eyes to line up the leading edge to that point. Being thoughtful in this process is key and just try to make sure the club isn’t wiggling around.
In the bow, with our shoulders just over the toes, we can see if the club is resting in good relationship to the body. Understanding the distance our body should be to the club is huge. This alone can make or break our ability to strike the ball well. Keeping one hand width from our body to the club is a general rule of thumb throughout the entire bag. The space in which we stand to the club shouldn’t change. What changes is the length of the club in our hands.
These components culminate the very first steps we take to hit a shot. This is the essence of set up, which generates our best chances to develop consistent shot patterns to the target. As a result of properly managing these components, we can begin to maintain accuracy and easily repeat our movement patterns to get the ball close to the target. We can also begin to self-correct our misses if we are accountable with these steps.
Foot width and ball position
Lastly, in the set up we step our feet to the ball’s position and generally maintain a stance that is approximately shoulder width. After gripping and bowing the next thing a player needs to do is step to the ball position. This will impact the club’s ability to generate loft, also depending on the chosen club. Generally, a driver ball position is forward in the stance. The mid-iron ball position is mid stance and most full-swing wedges are played just back of center with a more narrow stance. Taking the time to better understand the components of set up and ball position will generate 100 percent of our success to better ball striking.
A final word
Take some videos of yourself and look at the body from head to toe. Is your setup in a ‘Z’ or ‘S’ formation? Where is your weight in your shoes? Heels, mid-shoe, or toes? Does your setup look like an ‘H’or ‘C’? Is your weight too far in the heels or toes? In my experience, it is easier to maintain posture in the golf swing and overall athleticism by keeping the stance’s pressure points more forward in the mid-shoe to the toes. This enhances the pelvic tilt and the arms’ ability to hang. Therefore, posture throughout the swing improves and we are less likely to grip so tight.
Any questions? Book a lesson with LPGA instructor Donna Fiscelli through her booking site.
- LIKE37
- LEGIT8
- WOW2
- LOL1
- IDHT0
- FLOP0
- OB0
- SHANK8

PGA Tour Coach and Golf Channel Academy instructor, Shawn Clement, shows you how insanely adapt your arm anatomy is to get consistent releases when you allow it to happen in the direction you want the ball to start!
- LIKE4
- LEGIT1
- WOW0
- LOL1
- IDHT0
- FLOP1
- OB1
- SHANK7


Morning 9: Rahm’s hot Ryder Cup take | Zhang’s new caddie | Poults backs Rahm

K.J. Choi WITB 2023 (June)

Dave Portnoy says he’d ‘fire caddie on the spot’ if they said what Rickie Fowler’s did at US Open

Erik Compton WITB 2023 (May)

Tiger Woods delivered stinging message to major winner after denying him lift on private jet

Chris Gotterup WITB 2023 (June)

Chris Gotterup WITB 2023 (June)

Rickie Fowler WITB 2023 (June)

Report: LIV exec calls McIlroy a ‘little b***h’ and says they can now finally get these 2 PGA Tour stars

The Wedge Guy: Making the short ones

Jay Giannetto WITB 2023 (July)
Jay Giannetto’s what’s in the bag accurate as of 2023 John Deere Classic. More photos from the event here. Driver:...


Brandon Matthews WITB 2023 (July)
Brandon Matthews what’s in the bag accurate as of the 2023 Rocket Mortgage Classic. More photos from the event here....


Sepp Straka’s winning WITB: 2023 John Deere Classic
Driver: TaylorMade Stealth 2 Plus (9 degrees) Shaft: Mitsubishi Kai’li White 60 TX 3-wood: TaylorMade Stealth 2 (15 degrees) Shaft:...

Peter Kuest WITB 2023 (July)
Peter Kuest what’s in the bag accurate as of 2023 Rocket Mortgage Classic. More photos from the event here. Driver:...
-
 19th Hole2 weeks ago
Tiger Woods delivered stinging message to major winner after denying him lift on private jet
-

 Whats in the Bag2 weeks ago
Seamus Power WITB 2023 (June)
-

 Whats in the Bag3 weeks ago
Omar Morales WITB 2023 (June)
-

 Whats in the Bag3 weeks ago
Blayne Barber WITB 2023 (June)
-

 Whats in the Bag3 weeks ago
Ben Carr WITB 2023 (June)
-

 Whats in the Bag2 weeks ago
Tom Hoge WITB 2023 (June)
-

 19th Hole3 weeks ago
Journalist alleges this is the ‘unforgivable’ act Phil Mickelson committed against Pat Perez and his wife
-
 News2 weeks ago
Keegan Bradley’s winning WITB: 2023 Travelers Championship
Steve Kruse
Apr 29, 2022 at 12:39 pm
Good article, thanks